

 How to use ? - Portable solar cooker
Step 1
Paint the bottom and sides of the tin with a "high temperature" black paint spray .
After drying, open the upper part of the tin using a "security can opener".
Empty and clean the inside of the tin.


Step 2
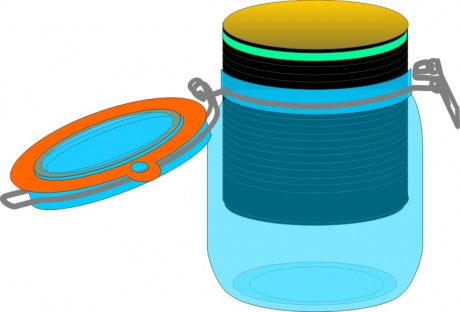
Put a rubber band around the tin, just below its top edge (to use as a joint).
Insert the tin into the jar (clean and dry inside).
Push it down gently into the jar.
Check if the joint is tightly squeezed against the glas.

Step 3
Make a hole in the gasket with a punch (or awl).
This hole should allow the steam to come out and avoid any risk of burns.
To test, put a little bit of water in the tin, close the jar and check by shaking if some water comes out the hole.


Step 4
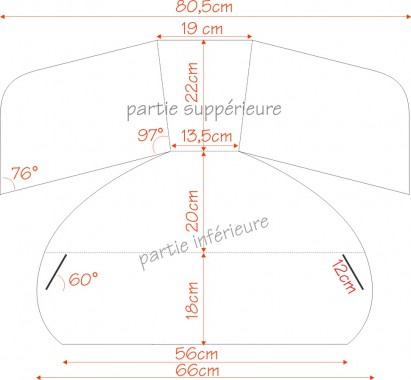
Report the diagram on a cardboard.
Cut out the shape using a box cutter or a pair of scissors.
The dotted lines should not be cut but only slightly marked with a punch and a ruller. They will be folded later.
The upper part can be cut separately from the rest and attached with a piece of cardboard (see further).
The two 12cm slots must be approximately 1 mm thick (if needed enlarge them with the help of an awl).

Step 5
Coat the cardboard with wallpaper glue or white glue.
Cover it with an aluminium foil (glossy side facing up) and glue it by expelling the air bubbles from the centre toward the edges.
Dry it with the cardboard side upwards and weights to keep the cardboard flat.
Once dry, return it and cut along the edges to take of all the overlapping aluminium parts.


Step 6
Cover the folding parts on the cardboard side with self-adhesive fabric tape.
Attach the upper and lower parts gluing a piece of cardboard ("hinge").
Strengthen the corners of the reflectors with self-adhesive fabric tape.


Step 7
The reflector can be folded in three to carry around.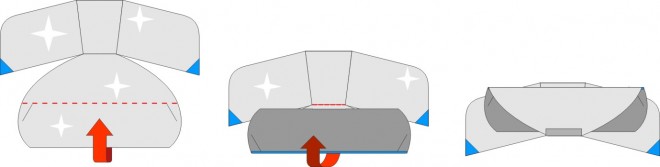

Step 8
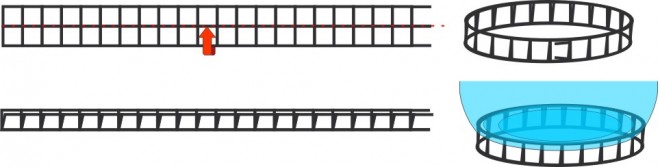
Using pliers, cut the wire mesh to form a ribbon of about 28 cm long and 3 cm high.
Fold the wire meshin in half to form a 1.5 cm high ribbon.
Form a circle (base) with this wire ribbon, about 8.5 cm in diameter.
Place the jar on this base and adapt its diameter if necessary to ensure sufficient stability.

 |  |  |  |  |  |  |  |